How to Take a Video of Your Screen by iTop Screen Recorder?
Screen recording is an essential skill in today’s high-tech world. Just think about how useful it would be to quickly make teaching videos, capture exciting video game moments, or record an important presentation. In these situations, a screen recorder is like a trusty friend that helps you achieve what you want easily.
In this article, we will take a journey together and guide you to Screen Recorder through each step of screen recording. We aim to make sure you understand everything without making it complicated. Let’s dive in and learn about it together.
Select the Proper Screen Recording Software
Selecting the right screen recording software, like iTop Screen Recorder, is the initial and crucial step in capturing your screen. iTop Screen Recorder supports multiple recording modes, such as screen recording, audio recording, webcam recording, and game recording. As a free screen recording software, it can not only meet the diverse recording needs of users but also produce high-definition videos with no time limit.
Set Your Recording Settings
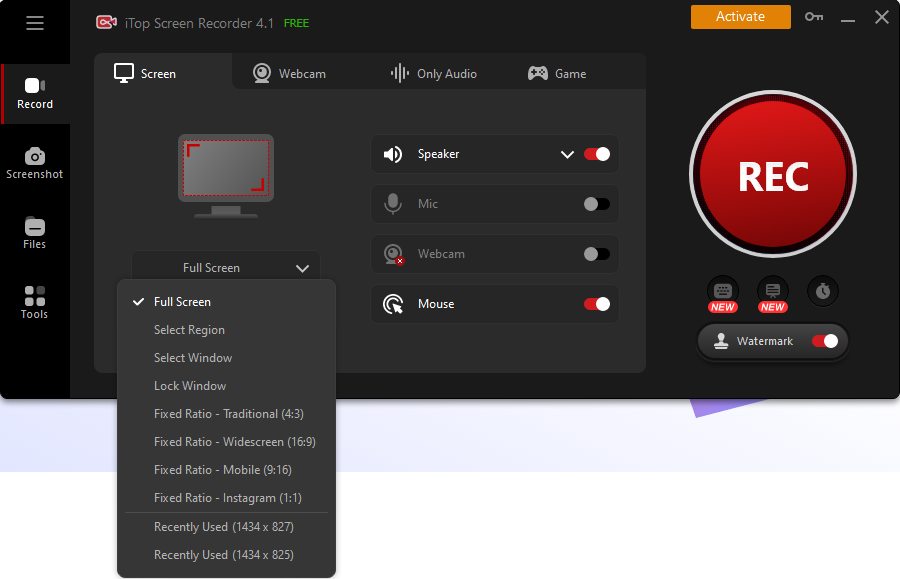
Open the iTop Screen Recorder after installation to set the recording parameters. These settings, available in iTop Screen Recorder, allow you to specify the portion of your computer monitor to record from, as well as the video quality and audio sources. With iTop Screen Recorder, you can record 4K/1080p videos without lagging or a time limit. Make sure your settings are appropriate for the recording you want to make, whether it’s a full-screen capture, a capture of a specific application, or a capture of a specific area of your screen.
Get Your Screen Ready
Before you begin recording with iTop Screen Recorder, ensure your screen is set up exactly as you want it to appear in your video. Close any unnecessary applications or windows and organize your desktop for a clutter-free recording. When using iTop Screen Recorder, this preparation will help you create a polished and professional-looking video.
Start Recording

Now, it’s time to hit the record button. Most screen recorders, like iTop Screen Recorder, will provide a countdown before the recording begins. This gives you a few seconds to prepare before your screen activity is captured. Perform your actions on the screen, whether demonstrating a software process, giving a presentation, or anything else you want to record.
Pause and Edit
During your recording, you can pause and resume as needed. This allows you to capture only the relevant content, making later editing easier. Don’t worry if you make a mistake; pause, correct the error, and continue recording from there.
Stop Recording
Stop the recording when you’ve finished recording with the iTop Screen Recorder. Your video will be saved to a location specified in the software’s settings, and you can save recordings in formats such as MP4 or AVI. It’s a good practice to save your videos or audio in an organized manner so you can easily locate them when needed.
Edit Your Video
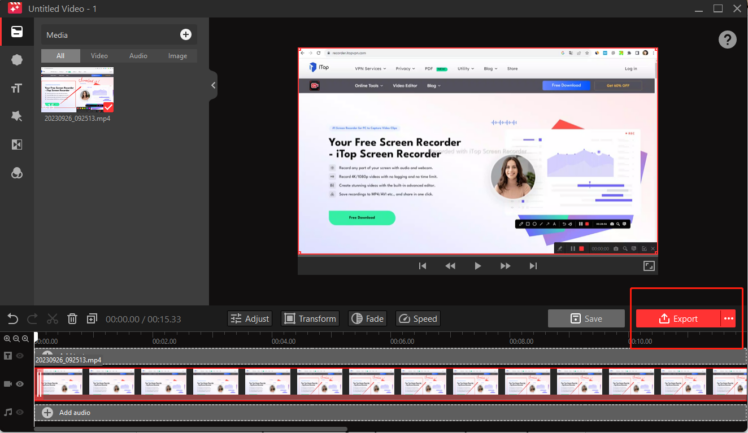
After you’ve stopped recording with iTop Screen Recorder, it’s time to edit your video if necessary. Using the built-in advanced editor, you can trim the beginning and end, add annotations, insert text, and even include background music or voiceovers. This way, you can create stunning videos with ease.
Export and Save Your Video
Once you’re happy with the changes you’ve made to your video, use iTop Screen Recorder, a free screen recorder for your computer, to save and export your video in the format you like. This handy tool has four modes that make capturing your screen, webcam, audio, and game clips easy and fast. Whether you want to share your video on social media, upload it to YouTube, or send it to your colleagues, choose a format that suits how you plan to use it.
Post Your Screen Recording
It’s time to share your video with your viewers now that you’ve effectively finished it. You can email it, post it on social media, or upload it to video-sharing sites like YouTube or Vimeo. Always keep your target audience in mind when selecting the best distribution strategy.
Getting Better through Practice
Remember, the more you practice, the better you’ll get. When you use an iTop Screen Recorder for recording and editing, practicing will make you more skilled. If your first tries aren’t perfect, don’t quit; learning from your mistakes is part of the process.
Conclusion
Computer monitor capture has been introduced to make it more user-friendly than ever. With the help of the right software like iTop Screen Recorder and clear instructions, you’ll be able to create engaging and informative videos that are specifically catered to your audience. Start screen recording right away by taking the start with iTop Screen Recorder. Your target audience is waiting for the material you can provide, and you have the means at your fingertips to show off the wonders of your screen.